What Is a Project Plan?
The project plan is a central element of project documentation. It typically includes at least the following elements:
- Project scope (what is included and excluded)
- Work breakdown structure (WBS)
- Project schedule (with milestones and deadlines)
- Resource plan (personnel, materials, budget)
- Risk assessment
and answers the following questions:
- WHAT needs to be done?
- WHO is responsible for it?
- WHEN does it need to be completed?
- HOW MUCH effort does it require?
A well-thought-out, realistic, and continuously updated project plan forms the foundation for project control and monitoring. It makes it possible to check progress regularly and make adjustments when needed — so the desired project outcome can be delivered on time and within the planned budget.
To create a project plan and keep it up to date throughout the project, it is advisable to use a project management tool like Allegra right from the planning stage. Such a tool ensures that the entire team — all stakeholders, management, and other project participants — stays informed, everyone knows what they need to do, and the current project status is accessible at any time.
Project Plan vs. Project Manual
A well-managed project always has a project manual. The project manual describes the project-specific process. For example, it lists the roles with their responsibilities and accountabilities, but does not name the individuals assigned to those roles. It stipulates, for instance, that a test protocol must exist for each component — but does not describe the individual components and their functions. The project manual thus only names the classes of artifacts and tasks to be created, not their instances.
By contrast, the project plan addresses every instance — that is, all tasks, every artifact, and all functions. The project plan also defines the schedule for the entire team.
Project Plan vs. Work Breakdown Structure
The work breakdown structure (WBS) is an organized collection of the tasks, sub-tasks, and work packages of a project. The information it contains is only part of what is needed for a complete project plan. A WBS, for example, does not account for logical dependencies between work packages, nor does it address risks in any detail. In team communication, a WBS can be a useful component of a project plan, but in practice it is often represented directly as a Gantt chart.
Project Plan vs. Project Management Plan
The PMBOK Guide (Project Management Body of Knowledge) published by the Project Management Institute (PMI) refers to the project plan as the project management plan. The two terms are therefore synonymous. Another synonym is the term “work plan.”
The 8 Steps of Project Planning
Creating a good project plan means clarifying a series of questions at the start of the project in a specific order. You cannot, for example, commit to dates for various tasks if you do not know the required effort. And you cannot reliably estimate that effort if you do not know the desired project outcome. The best approach is therefore to proceed step by step as follows:
- Define goals and requirements (scope)
- Create the work breakdown structure (WBS)
- Estimate effort
- Plan the sequence and milestones
- Plan dates and timeframes
- Plan resources and assign roles
- Conduct a cost-benefit analysis
- Draw up a risk register
Each of these steps is described in more detail below.
Step 1: Define Goals and Requirements
Define goals
Mark Twain’s famous saying — “When we lost sight of the goal, we redoubled our efforts” — still resonates in project work today. Creating a project plan without being clear about the project goals is simply not possible. Every ambiguity increases the risk of ending up with something different from what was envisioned — at a higher price, at a later date, or all of the above. The SMART goals method helps to define good goals.
Solution concept as project goal definition
A description of the desired project outcome is the essential foundation for any project plan. In German-speaking countries, this is often done in the form of a requirements specification and a functional specification. In practice, a single solution concept — or blueprint — jointly developed by the client and contractor often works better than the purely requirements-focused view in separate specification documents.
Describing the project goal in the form of requirements or by defining a solution concept requires the author to have a clear mental picture. The more concrete and detailed that picture is, the more reliably planning can be carried out later. An inexperienced author will overlook many functions and tasks and therefore fail to account for them in the project plan.
Goals as high-level requirements
How do goals differ from requirements? One useful perspective: they don’t! Goals are the highest, most abstract level of requirements. Requirements become increasingly detailed over time, while goals do not change significantly.
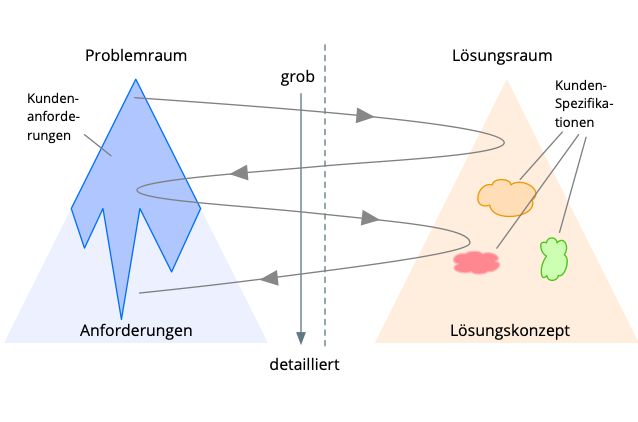
The Twin-Peaks model — proven in practice
In practice, the “Twin-Peaks” model has proven helpful for defining requirements and a solution concept. It makes clear that even when writing requirements, you must — and are allowed to — move within the solution space, because otherwise many open questions in the problem space will never come to light. The central deliverable is a solution concept that describes the desired project outcome in a form that is equally understandable to both client and contractor (tables, text, diagrams).
Step 2: Create the Work Breakdown Structure (WBS)
Based on the goals, requirements, or solution concept, you create a work breakdown structure (WBS) in the second step. The WBS shows the entire project structure in hierarchical form by breaking the project down into sub-projects, sub-tasks, and work packages. This makes the project more understandable and manageable for the team and provides a solid basis for creating the project plan — including scheduling, resource planning, and cost planning.
You can think of the WBS as the translation of the solution concept or requirements into a hierarchical tree structure.
Sub-projects make it possible to use different process models within an overall project. For example, it may make sense to use a classic waterfall method for the development of electronics in one sub-project, while using agile methods for the associated software development in another.
Sub-tasks are elements that can be broken down further within the WBS.
Work packages represent the lowest level of a WBS and can be further divided into activities or tasks in the subsequent planning process.

There are various approaches to structuring: object-oriented (based on physical components), function-oriented (by function or area of responsibility), or phase-oriented (along the project timeline).
Breaking the project down into individual steps or work packages makes it manageable, calculable, and goal-directed. It simplifies communication within the team. At this stage, there is no need yet to address logical dependencies, effort, or resources.
Step 3: Estimate Effort
Creating a project plan always includes effort estimation. There are numerous methods and approaches for estimation. Unfortunately, none of them can substitute for experience with a similar project. Many effort estimation models have parameters that first need to be calibrated — and without data from previous projects, those parameters are simply unavailable, which means the models offer limited practical value in real-world project management.
Gathering experience
When it comes to creating a project plan, nothing — and this holds here more than anywhere else — can replace experience. There are many effort estimation methods, all of which rest on the assumption that the new project can be adequately described by an existing, empirically grounded model. This works better in some cases than others. When building a residential house, for example, you can use enclosed volume as a key metric — and for a church as well. If you have built enough houses, you will have a solid idea of how long the next one will take and what it will cost. If you applied those same figures to a church, however, you would be quite far off the mark.
When there is no experience with similar endeavors, effort and scheduling estimates are speculative, and significant deviations should be expected. “More expensive” and “later” is the typical direction of the gap between plan and reality — likely also because many clients do not want to know how much it will really cost and tend to award the contract to those who tell them what they want to hear.
Similar predecessor projects
The most reliable plans and estimates are based on similar predecessor projects with comparable tasks. They do not assume that general technological progress will noticeably reduce effort on the new project.
Estimates from the person later responsible
It is important that effort estimates are provided by those who will be responsible for executing the relevant tasks. Planning from the armchair often ends in bruises. In some technology domains, the performance of individual team members plays a significant role. Particularly in knowledge work, productivity differences of 500% are not unusual. Except in very large teams — where such differences average out — you should therefore know your team members and involve them in effort estimation.
Do not negotiate effort down
Do not bargain down the effort figures provided by your team members. As a rule, your team will underestimate the friction that arises and overestimate their own productivity.
Categorize activities by effort class
It can help to assign activities to effort categories. In agile contexts, “Story Points” with relative effort values roughly corresponding to a Fibonacci sequence are commonly used. You can also define simpler categories — for example: small, medium, large.
A particularly valuable practice is to calculate the average actual effort at the end of each project and merge it with the averages from previous projects to form a running overall average. On the next project, the planning process then becomes primarily a matter of categorizing tasks, while the actual effort is derived from the metrics of comparable past projects.
Do not assume productivity gains
If you believe things will go much faster this time than last time, you should have a sober explanation. New tools and methods do not qualify.
When you introduce new ways of working to boost productivity, expect that any anticipated gains will be consumed the first time by the ramp-up effort and lack of experience.
Creating a project plan with planning poker
Planning poker is an interesting method for arriving at reliable effort estimates in project planning. The participants — the estimators — meet under the guidance of a facilitator. Each estimator receives an identical deck of cards. These cards can be purchased; one common variant uses the numbers 0, 1/2, 1, 2, 3, 5, 8, 13, 20, 40, 100, plus a ? to indicate that an estimator does not feel able to provide an estimate. The numbers can represent effort in days, or stand in some other pre-agreed constant relationship to actual effort.
At the start, a product manager presents the project deliverables. The team can ask questions about anything unclear.
Each team member then places their chosen card face down in front of them. Once everyone has placed their card, the cards are all turned over simultaneously.
The estimators with the highest and lowest values are given the opportunity to explain and justify their estimates. The group may discuss what has been put forward. The facilitator or project manager can set a time limit for discussion.
The estimation process followed by discussion is repeated until the group reaches consensus. Throughout this process, the estimator responsible for delivering a given result always carries more weight than other participants.
The numbering of the cards reflects the fact that estimation uncertainty grows with the size of the estimate. This prevents estimators from feigning false precision on larger values — they must instead commit to either a pessimistic or an optimistic figure.
Effort and duration
A frequent source of confusion is the distinction between “effort” and “duration.” Duration — or “activity duration” — is the length of the time interval between the start of an activity and its completion, excluding non-working time, measured in working days.
Effort — or “work effort” — is the total amount of working time that must be invested in the activity from start to finish.
Watching a concrete slab dry may take several days, yet the work effort involved is minimal.
Step 4: Plan the Sequence and Milestones
Sequence planning produces the project schedule: work packages are arranged in a logical order. Dependencies must be taken into account — for example, certain work packages must be completed before others can begin.
Identifying dependencies
Sequence planning is carried out using an activity list that establishes the order of work packages. The activity list contains the work package number, the name of the work package (activity), the estimated duration of the activity, and possibly the person responsible for its execution (resource).

Defining milestones
For later monitoring — for example using milestone trend analysis — and for better visibility and communication within the project, you should highlight the completion of important work packages or sub-tasks by linking them to a milestone. This allows project phases or significant interim states in the project to be marked clearly.
Step 5: Plan Dates and Timeframes
Most activities require resources (people to carry them out) who must be available between the start and end dates of an activity. Scheduling and resource planning are therefore closely coupled.
Whether you first assign resources to activities — thereby deriving dates based on effort — or assign resources based on fixed dates depends on where you have flexibility. If neither resource availability nor dates can be changed, you will not end up with a workable project plan.
Bottom-up and top-down planning
Creating a project plan is, in many organizations, an iterative process in which desired or required dates and budgets are initially set from above. Those responsible for execution then set their own time and effort estimates against these. In such cases, it is useful to distinguish between the requested or target dates and available budgets on the one hand, and the dates and effort to which an assignee actually commits on the other.
Backward planning with milestones
The delivery date for the project outcome is often fixed from the very beginning — due to trade fair dates, customer commitments, or regulatory requirements. In such cases, backward planning is a natural approach: starting from the final deadline, activities are arranged so that the project start date falls in the future. For the day-to-day prioritization and time management of team members, the ALPEN method can be a valuable complement.
Step 6: Plan Resources and Assign Roles
In a project plan, resources encompass all people and items needed to execute the plan. In theory, it is most efficient when each team member can dedicate themselves fully to one project without being repeatedly interrupted by other tasks. In many cases, however, this is not realistic. It should also be noted that team members can typically devote less than 80% of their time to the actual project work.

Assigning roles
Once it is clear which resources and team members are available for the project, the roles described in the project manual are filled by specific individuals. A RACI matrix can help assign responsibilities and accountabilities clearly. This gives those individuals responsibilities that may not necessarily be reflected as work packages in the WBS.
Project manager view and team manager view
In many organizations, team members are organized into teams and departments and are made available to projects by their departments. To maintain an overview of each team member’s workload — since people are often working on several projects in parallel — a view of resources from the perspective of the line organization as well as from that of the respective project manager is needed, as implemented in Allegra project management software.
Step 7: Cost Planning and Budget
No project should begin without a cost-benefit analysis. This requires that all the effort and costs involved are known. Labor effort is derived from the work breakdown structure; external costs and material costs are determined at the latest through resource planning.
The cost plan is therefore based on the estimates underlying the project plan. This underscores the importance of estimates that are as accurate as possible, since they directly affect the outcome of any cost-benefit assessment.
Step 8: Draw Up a Risk Register
Every project faces risks that can threaten its success. A risk register helps to identify potential problems early and plan measures to address them. It enables the project team to monitor risks systematically — and by identifying and addressing risks before they endanger the project, it helps protect both the budget and the schedule.
Sample Project: Website for a Small Business
In the following, we will create a project plan using a small example.
Step 1: Formulate goals and document requirements
The goals are:
- Develop a user-friendly website for the company.
- Implement an online store to expand sales opportunities.
- Optimize the website for search engines (SEO) and mobile devices.
- Ensure a secure payment and ordering process.
We document the requirements in a dedicated document structured like a user manual for our new system. We use mockups for the user interface and UML use case and sequence diagrams to model our requirements.
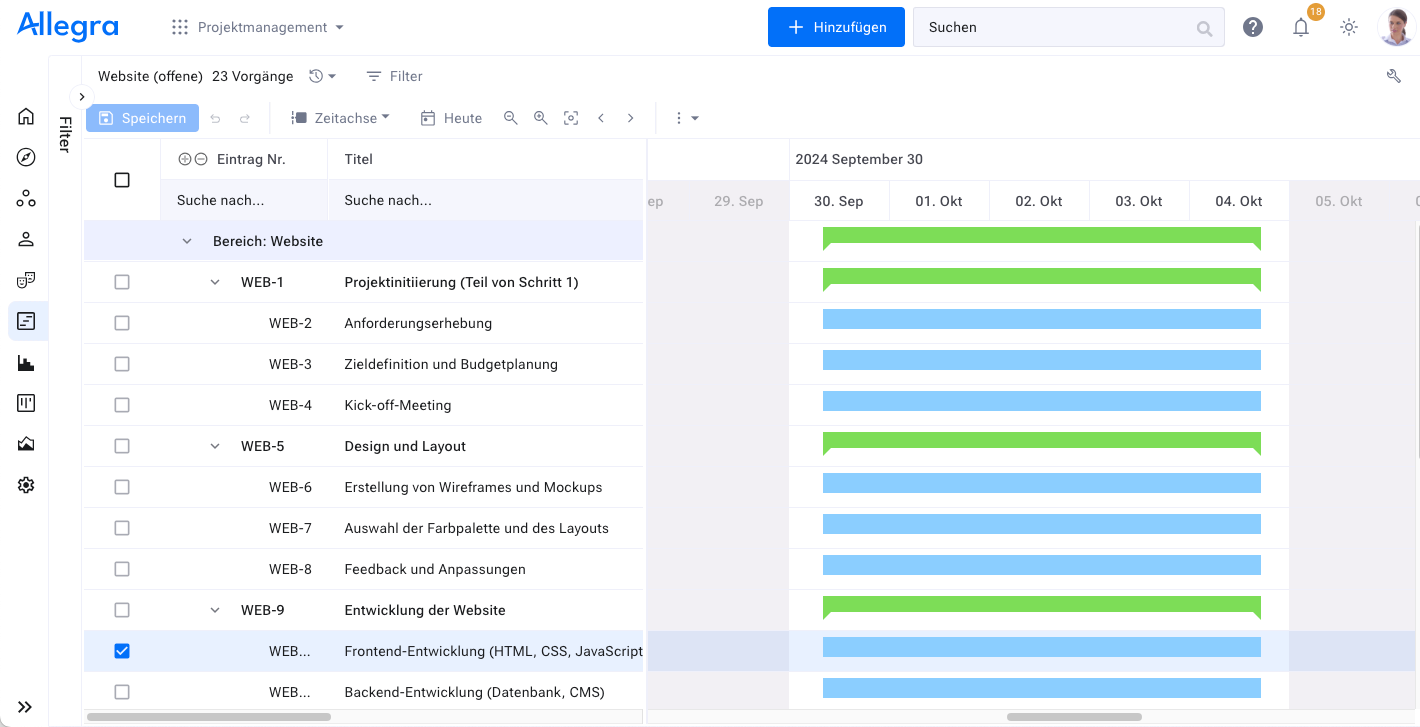
Step 2: Create the work breakdown structure (WBS):
-
Project initiation (part of Step 1)
- Requirements gathering
- Goal definition and budget planning
- Kick-off meeting
-
Design and layout
- Creation of wireframes and mockups
- Selection of color palette and layout
- Feedback and adjustments
-
Website development
- Frontend development (HTML, CSS, JavaScript)
- Backend development (database, CMS)
- Integration of e-commerce functions
-
Content and SEO
- Creation and publication of content (texts, images, videos)
- SEO optimization (keywords, meta tags, page structure)
-
Testing and quality assurance
- Functional tests (forms, buttons, links)
- Browser and device tests (desktop, mobile)
- Security tests (payment processing, data encryption)
-
Launch and maintenance
- Website launch and public relations
- Bug fixes after go-live
- Ongoing maintenance and updates
In Allegra, this looks as follows:
Step 3: Estimate effort
We now estimate the effort for each work package. We involve the likely people responsible for those packages — where known — or look for other experienced team members who have handled similar tasks before. In most cases, we assume that effort equals duration, minus any days that are non-working days for everyone.
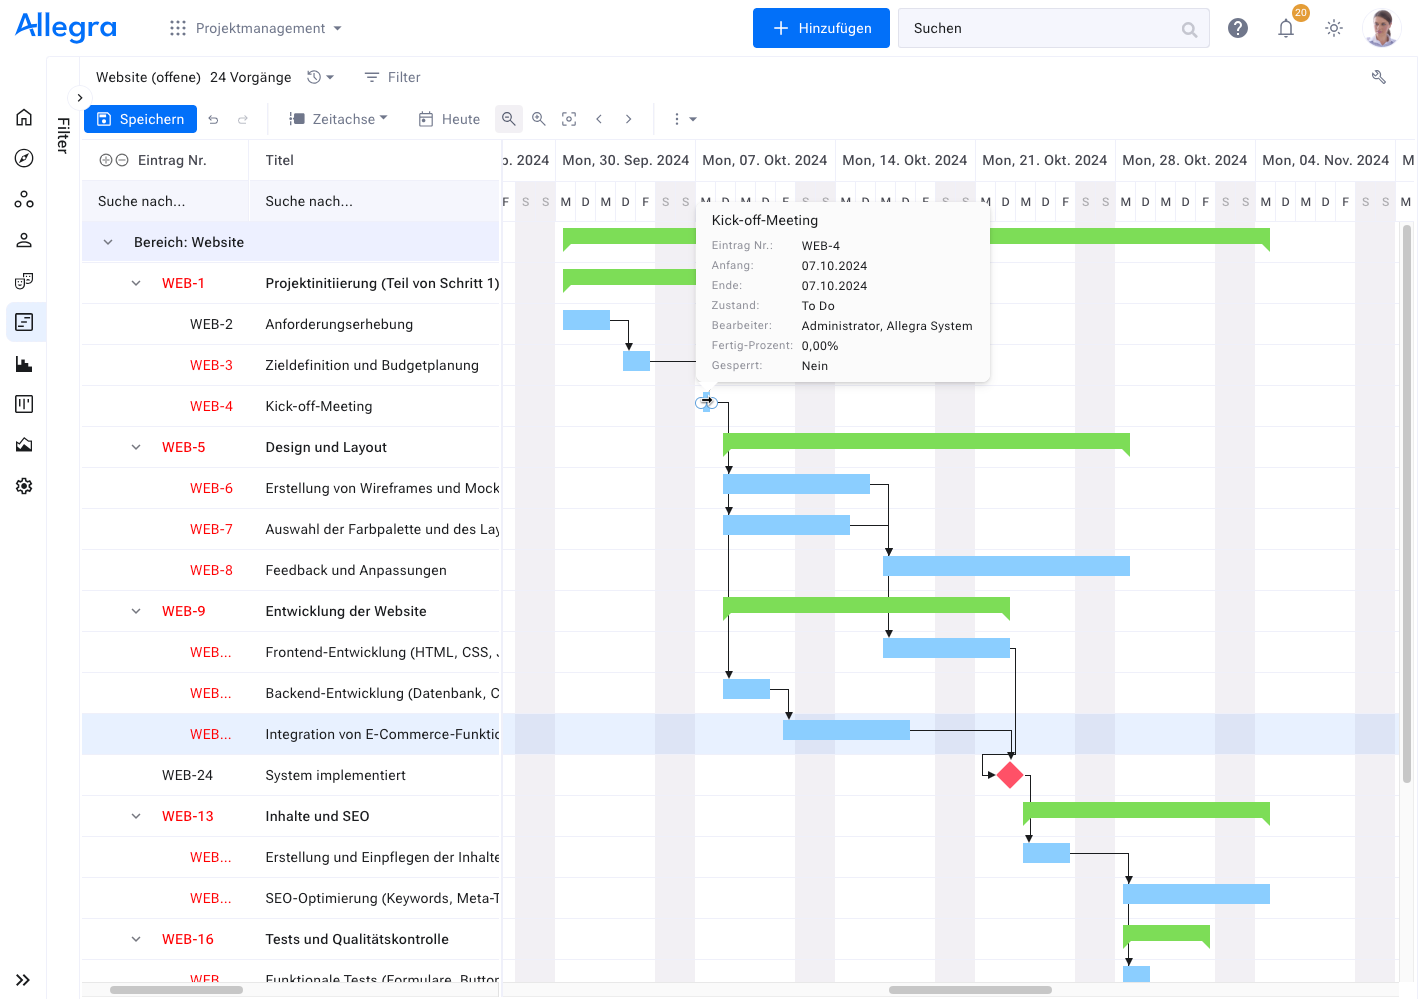
Step 4: Plan sequence and milestones
In this step, we add the logical dependencies between the work packages and define a few milestones. In Allegra, this looks as follows:
Step 5: Plan dates and timeframes
Now we plan all dates that are not already determined by logical dependencies. We can also fix certain dates against shifting — for example, when they are externally mandated. It is also wise to build buffer time into the critical path so that unexpected events can still be absorbed.
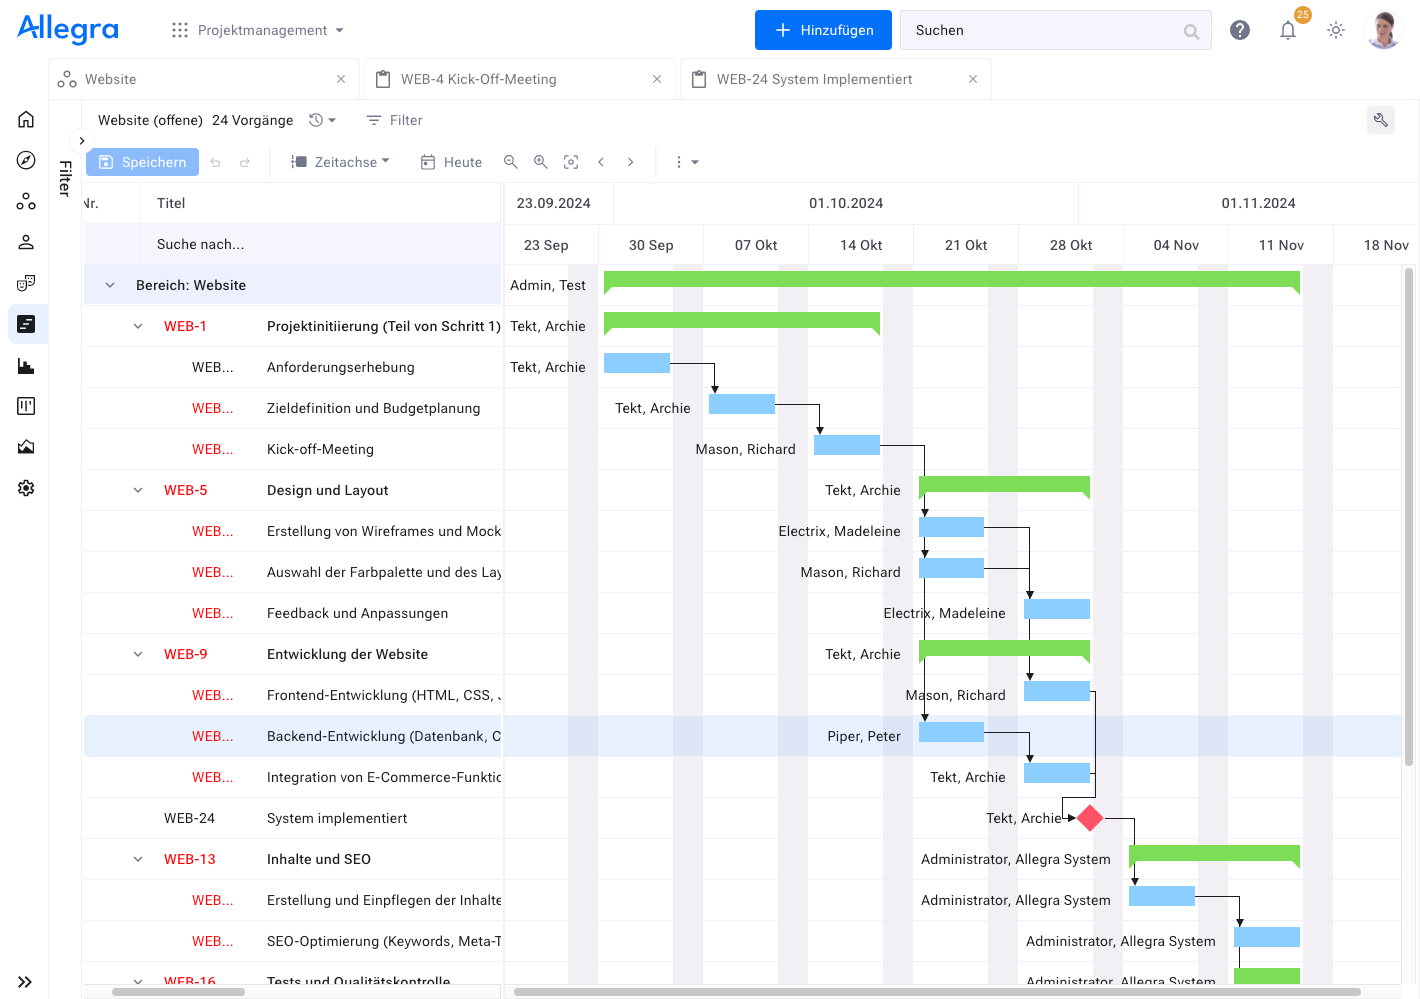
Step 6: Plan resources and assign roles
In this step, we assign people responsible for each work package. The project leads must ensure that the resources have the required available capacity. The assigned team members must review the previously estimated effort and adjust it where necessary.
In Allegra, this looks as follows:
Step 7: Cost planning and budget
A project should be economically viable — meaning it must not exceed a previously determined cost ceiling. We distinguish between the budget and the planned value. The budget is a top-down specification set by management based on strategic or economic considerations. The project planned value is based on the estimated costs for all work packages and other expenses and is determined bottom-up. The top-down budget should never be smaller than the bottom-up planned values for costs.
In Allegra, we enter the budget at the top level of the hierarchy, and we carry over the effort estimates for each work package into the planned value field.
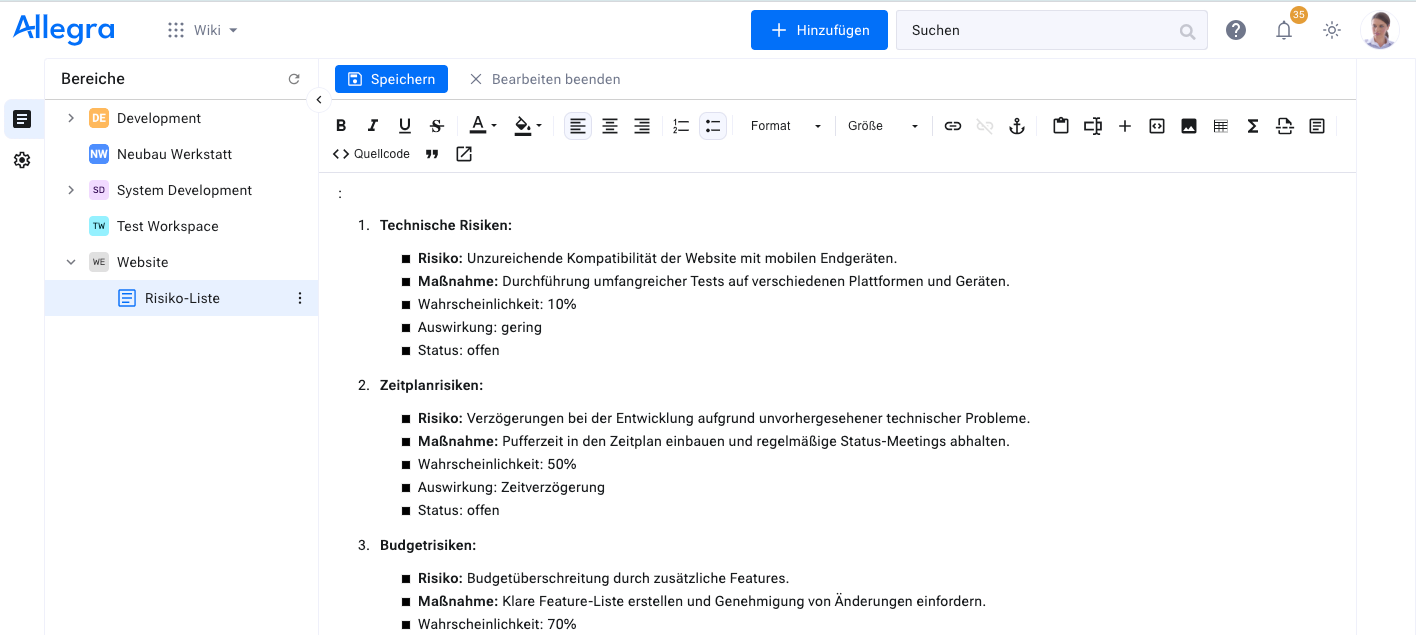
Step 8: Draw up a risk register
Here is a sample list of potential risks:
-
Technical risks:
- Risk: Insufficient compatibility of the website with mobile devices.
- Measure: Conduct extensive testing across different platforms and devices.
-
Schedule risks:
- Risk: Delays in development due to unforeseen technical problems.
- Measure: Build buffer time into the schedule and hold regular status meetings.
-
Budget risks:
- Risk: Budget overrun due to additional features.
- Measure: Define a clear feature list and require approval for changes.
-
Quality risks:
- Risk: Insufficient functionality or errors at launch.
- Measure: Thorough testing and quality assurance before launch.
-
Security risks:
- Risk: Security vulnerabilities in the e-commerce system.
- Measure: Use secure payment systems and conduct regular security reviews.
In Allegra, we do not manage risks as separate activities but as a document — which makes handling them simpler. Here is what that looks like:
Frequently Asked Questions
How do I write a project plan?
To create a project plan, follow these 8 steps:
- Define goals and requirements
- Create the work breakdown structure (WBS)
- Estimate effort
- Plan the sequence and milestones
- Plan dates and timeframes
- Plan resources and assign roles
- Conduct a cost-benefit analysis
- Draw up a risk register
What does a project plan include?
A well-structured project plan contains clear work steps, processes, and responsibilities. This ensures that your team always has an overview of who does what by when. A project plan also helps in understanding the relationships between the various tasks and ensuring that everything is running according to plan — so a smooth project execution can be guaranteed.
What are the 4 phases of a project?
The 4 phases of a project are initiation, planning, execution, and closure. Each phase is an important step in the project management lifecycle and guides your project from start to finish. In project management, these phases are used to ensure the success and efficiency of the project.
Who creates the project plan?
The project plan is typically created by the project manager at the beginning of the project and continuously updated. Creating the project plan is a central responsibility of project leadership — especially for larger projects, where it requires considerable time. Project management thereby ensures a structured and efficient execution of the project.

CEO Alltena GmbH
Christoph Friedrich is a computer scientist and certified Project Management Professional. He has extensive experience in the introduction and integration of project management tools as well as the analysis and definition of processes in project and service management.